
We learnt many software programming languages with a hello world program, lets follow the legacy. With UiPath hello world example in simple steps, you can easily create your first and smallest RPA solution. This article also introduces you to basic user interface of UiPath studio in the process of creating the RPA solution.
UiPath hello world example – simple steps
Step 1: Create a blank project
- Open UiPath Studio
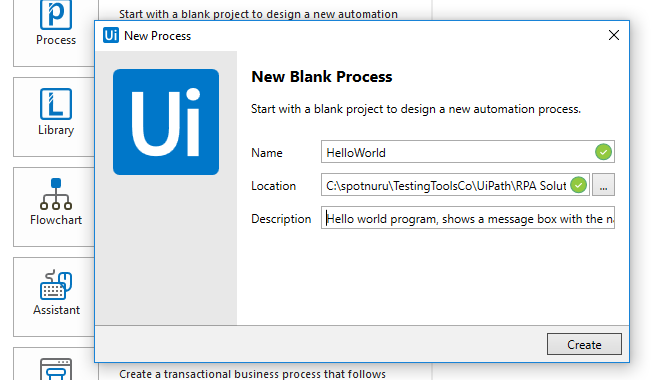
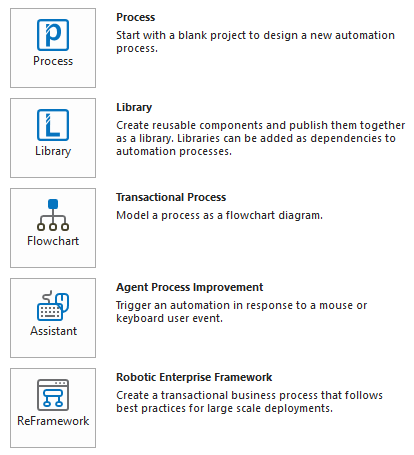
- Click “Process” in start menu, i.e. the first option in below screenshot.
- Enter name “HelloWorld” in the Name field
- Browse and select a location where you want to store this project.
- Provide any description, that is to describe about the project you are about to create.

- Click Create button to create the project.
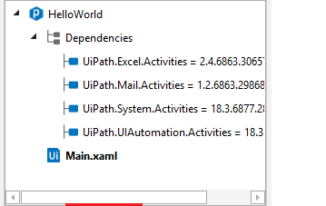
- It might take some time to get the project ready by downloading the dependencies and setting the design work bench ready.
Step 2: Add required activities to project
- Click on “Activities” tab on left side of the UiPath Studio.

- Search with text “input” in the activities search bar on top of the tab.
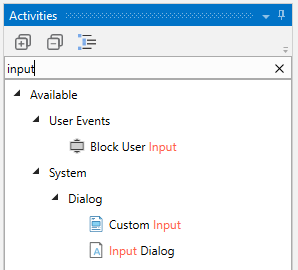
- Select the Activity “Input Dialog”, drag and drop in to the center section of UiPath Studio. This center part is also called as “Design area”.

- Once you drop the activity in design area, it will create an activity by name “Input dialog” in the “Design Area”, it looks something like below.

- First field represents the title of the input dialog that you want to present to end user, enter title for the input dialog. Say like “What is your name?”
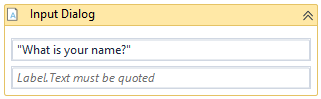
- Second field represents the field name that you want end user to provide, Say like “Name”.

- Remember that the text need to be entered within double quotes.
- If you observed carefully, this Input dialog activity is present inside another section called “Sequence”.
- You can add more than one activities to this sequence.
- Now that you have completed with input dialog activity.
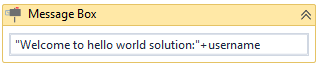
- Lets now add a message box, where it shows a text saying “Welcome to hello world solution:<name provided>”
- Search for the activity “Message Box” in the activities panel.

- Drag and drop the “Message Box” activity in to the “Sequence”, but just make sure you drop it just below the “Input Dialog” activity in the sequence.

- Select the “Input Dialog” activity now.

Step 3: Create variable in UiPath studio and use it
- On the right side of the UiPath Studio you can see something called “Properties Panel”, this panel displays the list of properties based on the activity selected in the “Design Area”

- Click on Result’s button

- You will be presented with a popup, where you are asked to enter a variable name. This output variable stores the value entered by end user when he/she was asked to enter their name.

- As this is a variable, we need to first create a variable of type “String” in UiPath studio.
- Enter output variable name as “username” without the double quotes and click “OK” button

- This is how it looks in Properties panel

- Now that you have a variable in which the value given by end user will be stored.
- We need to now make the “Message Box” activity display the desired text with the name given in input dialog activity.
- That is we can now display whatever name is entered in the input dialog.
- Now select the “Message Box” activity and enter the following text in the only field “Welcome to hello world solution:”+username
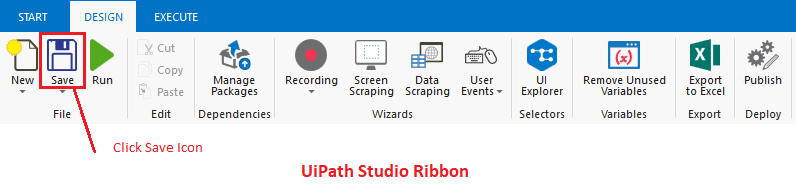
- Save the project by clicking on save icon on the top ribbon
Step 4: Run the RPA Solution to see our first solution in action.
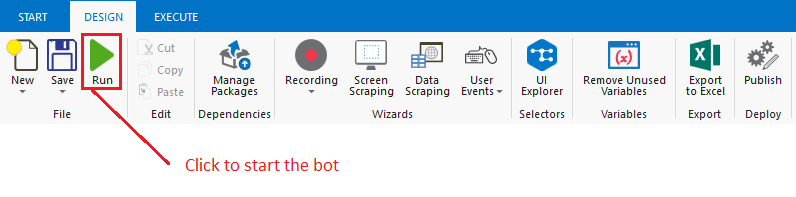
- Once the project is saved, click on Run Icon on the UiPath’s “Design” section of top ribbon of icons
- The solution is triggered and the bot is running now.
- Enter the name you want to show it in welcome message
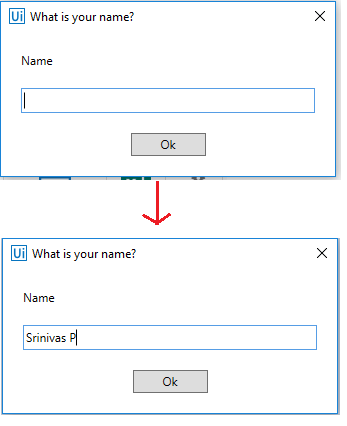
- Click “OK” button
- You will be presented with a Message box, in which can you see a greeting message along with the name we entered in the input dialog.

- Click “OK” button and you are done with execution of the solution.
- Bot is now terminated and you will focus comes back to the UiPath Studio.
You can explore on creating bigger solutions, search for different activities and what are they capable of. While we introduced some basic sections in the UiPath’s user interface. We will come back with a more detailed article explaining the user interface of UiPath studio.