This is one of the exciting areas for all testers and had picked up a lot of value in the recent past. A huge number of opportunities are available now in the market for test automation of mobile app testing, especially using Appium, Android Studio & Selenium WebDriver.
The very first time when I explored this area, I struggled for around three days to get this working facing errors one after the other. I am now writing this article for my readers, so that they can save their time from figuring out how to get started with simple automation of mobile app testing.
Before I dive in to detailed steps, I would like to share with you the environment I worked on for test automation of mobile app testing.
| S.No | Platform / Tool / Software | Version / Measure |
|---|---|---|
| 1 | Operating System | Windows 7 |
| 2 | Appium | 1.4.16.1 |
| 3 | Android Studio | 2.2.3 |
| 4 | RAM | 8 GB |
| 5 | JDK – Java | 1.8.0.112 |
| 6 | Selenium – WebDriver – Java Libraries | selenium-java-3.0.1 |
| 7 | Selenium – Standalone Server | selenium-server-standalone-3. |
| 8 | Mobile Emulator – Google Nexus 5 – Atom | Android Version 7.0 / Android N
API Level 24 |
Step by step instructions to automate mobile app testing using appium, android studio, selenium webdriver.
Step 1: Setting up Mobile app testing automation environment
Download the following list of software:
- Download Latest Android Studio for windows

- Download Appium for windows

- Download Latest Java
- Download Selenium Java Libraries
- 3.0.1, select folder 3.0,selenium-java-3.0.1
- Download Selenium Standalone Server
- 3.2.0, select folder 3.2, selenium-server-standalone-3.2.0.jar
Software installation
- Detailed steps to install java
- Installation of Android Studio – Steps are quite self explanatory.
- Installation of Appium Server – Steps are quite self explanatory.
Just make sure that you have administrative rights to install the software.
Setting required environment variables.
- Right click on “Computer”
- Select “Properties” Menu
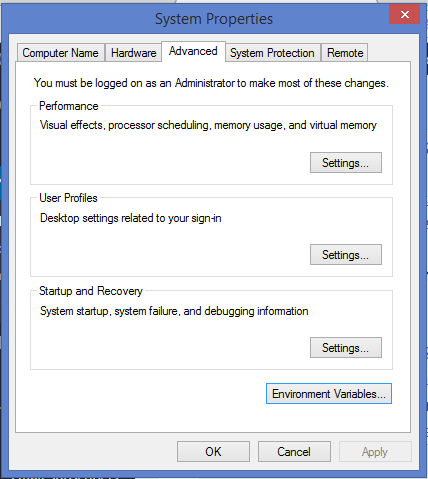
- Click on “Advanced System Settings” you will be presented with “System Properties” window
- Click on “Environment Variables” Button

- Under System Variables section
- Add a new variable as per the first option mentioned in the below table.
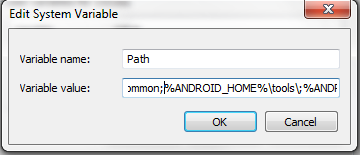
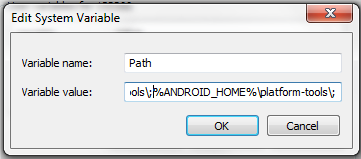
- Update existing Path variable as per the second option mentioned in the below table
| S.No | System Variable | Value for System Variable |
|---|---|---|
| 1 | ANDROID_HOME | C:\Users\{username}\AppData\Local\Android\sdk\ |
 |
||
| 2 | PATH | {ExistingPATH};%ANDROID_HOME%\tools\;%ANDROID_HOME%\platform-tools\; |
 |
||
 |
||
Important Note: During further steps, if you face any issue that is stopping you from proceeding, I would recommend you to refer to the last section of this article which is the troubleshooting section. I had drafted the issues and solutions for the issues I faced in the entire process or automating mobile app testing in a mobile emulator. It might help you in saving time.
Step 2: Creating project in Android Studio
In this step you will be covering following activities
| S.No | Activity Title | Activity steps |
|---|---|---|
| 1 | Create project | Detailed steps to create android project in Android Studio. |
| 2 | Add Libraries | Detailed steps to add selenium libraries to the above created project. |
| 3 | Create test script | Detailed steps to create a test script with in the project created above. |
While you are creating the selenium test automation script to automate mobile app testing , following two concepts will be highly handy for you.
| S.No | How to’s | Detailed steps link |
|---|---|---|
| 1 | Identify objects | How to find android mobile app object’s attributes and their values? i.e. to form the xpath, and to use in selenium webdriver script |
| 2 | Identify Mobile Application package and MainActivity | How to identify the Mobile application’s package name and Launcher Activity name, the details which are required for writing the selenium WebDriver script. |
Step 3: Execute your first Mobile App Testing automation script
In this step you will be covering following activities
| S.No | Activity Title | Activity steps |
|---|---|---|
| 1 | Create virtual device | Detailed steps to create virtual device in android studio. |
| 2 | Start Appium | Detailed steps to open and start appium server along with settings. |
| 3 | Launch emulator & execute test script | Detailed steps to launch mobile emulator and execute the test script created in earlier steps. |
Reference: Troubleshooting issues when working on mobile app testing automation
When you are working with Appium, Android Studio, Selenium WebDriver to automate the mobile application testing you might encounter issues and keeps you at hold, you will not be able to proceed any step further.
Issues might appear in different steps of the entire process, like:
| S.No | Issue at step | Issue Solution |
|---|---|---|
| 1 | Creation of project and configuring the selenium libraries | Unable to import junit or other libraries and code errors / Gradle unable to pull required dependencies |
| 2 | Execution of test automation script | INSTALL_FAILED_ALREADY_EXISTS: Attempt to re-install io.appium.settings without first uninstalling , similarly for io.appium.unlock app. |
| ps uiautomator error | ||
| Device is not online error:
Some times when you see this error in appium server, you have to first stop mobile emulator & appium server. Later launch and start appium server and start the mobile emulator, doing these steps will help in resolving the error. It is mandatory to follow the order of steps. |
Request you to kindly share any of your queries in form of comments, we would try our best to provide a solution for you.


I am done with all required setup/configuration for mobile testing. But I am unable to build successfully. Its showing “BUILD FAILED” message in Messages Gradle Build tab. Please could you give any solution for it.
Following is the error details:
Error:Gradle: A problem occurred configuring root project ‘MobileTesting’.
> Could not resolve all dependencies for configuration ‘:classpath’.
> Could not resolve com.android.tools.build:gradle:2.3.0.
Required by:
project :
> Could not resolve com.android.tools.build:gradle:2.3.0.
> Could not get resource ‘https://jcenter.bintray.com/com/android/tools/build/gradle/2.3.0/gradle-2.3.0.pom’.
> Could not GET ‘https://jcenter.bintray.com/com/android/tools/build/gradle/2.3.0/gradle-2.3.0.pom’.
> Connect to jcenter.bintray.com:443 [jcenter.bintray.com/159.122.18.156] failed: Connection refused: connect
Thanks in advance.
Hi Ramesh,
I am glad that you are following our article on Test automation of mobile app testing, this looks to be solvable 🙂
I had drafted detailed steps at how to solve this problem where gradle is struggling to pull required dependencies and android studio to build the project successfully.
In case you still have any further issues, please do revert to us, we shall try our best.
Thanks Srinivas. I made changes in gradle.properties file. Now, it is working fine.
I m glad that it worked, way to go…
Sir this problem is fixed somehow. Please ignore this issue.
Regards
Ok that’s great.. thank you for keeping it posted
Hi Srini,
It is very nice that you are sharing your knowledge on various aspects of test automation.
I was looking for this appium, and on right time I found your article. Thanks a lot for your knowledge sharing to testing community.
Thank you Shilpa, its been long time.. hope you are doing good..
I am glad my posts are helping in any means .. keep reading and learning..
Regards,
Srinivas P.
really awesome
Hi Srinivas,
I am new to appium. Following the instructions in your blogs, I was able to install the Android Studio and Appium on windows.
However, I got the message “Gradle sync failed: Failed to find Build Tools revision 27.0.3”.
When I checked the site you created to log known defects, I did not see this error in that list.
Can you please help?
Thanks in advance.
Regards
Satyasai B.
Hi Srinivas,
Please ignore my post, since it was my mistake that I did not notice a link right there in one of the frames of the Android Studio manager to install Build Tools 27.03, which when I clicked , errors are gone. Sorry for the inconvenience.
Regards
Satyasai
The download link of selenium-server-standalone-3.2.0.jar is incorrect.
it should be http://selenium-release.storage.googleapis.com/3.2/selenium-server-standalone-3.2.0.jar
Thank you very much for sharing the correct location, appreciate it